Error persistente que aparentemente no hay forma de arreglar.
Anotaciones de todo lo que voy probando:
✔️ Run System File Checker scan:
- Search for ‘command prompt’ using Cortana or Windows Search.
- From results, right click on Command Prompt and select Run as administrator.
- Type
sfc /scannow command and press Enter key. - Let the command complete and then reboot the machine.
✔️ Run Restorehealth:
- Search for ‘windows powershell’ using Cortana or Windows Search.
- From results, choose Windows PowerShell and select Run as administrator.
- Then type/paste following and press Enter key:
Repair-WindowsImage -Online -RestoreHealth
- Let the command complete, restart your system then.
Clean boot:
https://support.microsoft.com/en-in/help/929135/how-to-perform-a-clean-boot-in-windows
✔️ Change the display settings:
Sometimes, the issue may be caused due to incompatible display settings. Changing the settings or restoring them to the default settings might solve the issue for you.
- Press Windows key once
2, Select Settings from the start menu
- Click System
- In the System window, select the Display tab in the left hand pane (if it isn’t already).
- In the display tab, change the size of your text using the bar on the right pane. This should be the bar under the Change the size of text, apps, and other items: 100% (Recommended) You can choose any percentage except for the 175%. Setting the bar to 175% is known to cause the issue.
After selecting the font size, click Ok and check if the error persists.
Close Programs like Anti-viruses
- Press CTRL, SHIFT and ESC key simultaneously (CTRL + SHIFT + ESC).
- This should open the Task Manager.
- In the Task manager, click the Processes
4.. The Processes tab has a number of columns, look at the Description column and find the process that is related to the AVG anti-virus. It should have a name AVG or something related to AVG.
5.Select the anti-virus process from the list and click End Process (bottom right corner).
- Click Yes when prompted for confirmation.
Once done check if the problem is solved or not. If you are still experiencing the problem then make sure there aren’t any other security related programs running in the background. There might be programs other than the security programs that might be causing this issue. Try to turn off as many applications as you can to see if the problem is solved.
✔️Restart the File Explorer
- Press CTRL, SHIFT and ESC key simultaneously (CTRL + SHIFT + ESC).
- This should open the Task Manager.
- In the Task manager, click the Processes
- Locate and select the Windows Explorer.
- Click the Restart bottom at the bottom right corner
This will restart the file explorer and that will be the end of the problem.
✔️Change File Explorer Options
- Press and Hold Windows key and press R
- Type control panel and press Enter or click Ok
- Type File Explorer Options in the search bar
- Select File Explorer Options
- This will open the Folder Options
- Select the General tab if it isn’t already
- Select This PC from the drop down menu in Open File Explorer To:
Once done, click Ok and the problem should be resolved.
Clear the Cache & Create New Path
- In the toolbar, right click the Fil Explorer icon and select Unpin from toolbar.
- Press and Hold Windows key and press R
- Type control panel and press Enter or click Ok
- Type File Explorer Options in the search bar
- Select File Explorer Options
- This will open the Folder Options
- Select the General tab if it isn’t already
8.In the General tab, click the Clear button in the Privacy section.
9.Now, close the Windows Explorer by clicking the X at the top right corner of the window
- Right click on the Desktop at any empty space.
- Click New and then click Shortcut.
- This will open the Create new shortcut
13, In the dialog box, type C:\Windows\explorer.exe and click Next.
- Rename this file to File Explorer and click Finish.
Look what are the errors
Windows Key + S > type view all then click on «View all problem reports Control panel»
Can you right-click on a few of the «Windows Explorer» «Stopped working» errors > View technical details
What are the details of the errors?
Try resetting File Explorer (explorer.exe) Process:
- Press Windows Key + R and type SYSDM.CPL in Run. Click OK or press Enter key.
- In System Properties window, switch to Advanced tab, click Settings under Performance.
- Next, in Performance Options, under Processor scheduling, make sure that Adjust for best performance of: is set to Programs.
- Then in the same window, under Virtual memory, click Settings button.
- On Virtual Memory page, make sure Automatically manage paging file sizes for all drives option is checked. Click OK, then Apply, OK on rest of windows.
- Reboot the machine and see if issue is resolved now.
File Explorer Keeps Crashing in Windows 10
Fuente https://www.easeus.com/computer-instruction/how-to-fix-windows-10-file-explorer-keeps-crashing.html
File Explorer, originally known as Windows Explorer, is the built-in file manager application on Windows. It’s no doubt that is one of the most frequently used applications on a PC. However, although Microsoft has improved File Explorer continuously, there are still some problems with it, like File Explorer keeps crashing in Windows 10. This is an issue that bothers many users causing varying troubles. If you are troubled by «File Explorer crashing in Windows 10», you may find yourself in one of the following scenarios.
Symptoms
There are some common situations where users report «File Explorer crashing in Windows 10».
- Windows 10 File Explorer is not responding
- Windows 10 File Explorer stopped working
- File Explorer won’t open in Windows 10
- File Explorer keeps closing itself
- File Explorer closes while right-clicking a file
- File Explorer hangs frequently
Possible Causes
For some users, File Explorer seems to crash for no reason. Actually, every error comes with a cause. There are various factors that may trigger the issue «File Explorer keeps crashing», including:
- Improper system settings
- Incompatible third-party software
- Permission issues
- Other unknown causes
If you can’t identify the cause that leads to Windows File Explorer crashing, it doesn’t matter, you can follow the tips below in order.
10 Fixes for Windows 10 File Explorer Keeps Crashing
The solutions below are arranged based on the effectiveness of the tip.
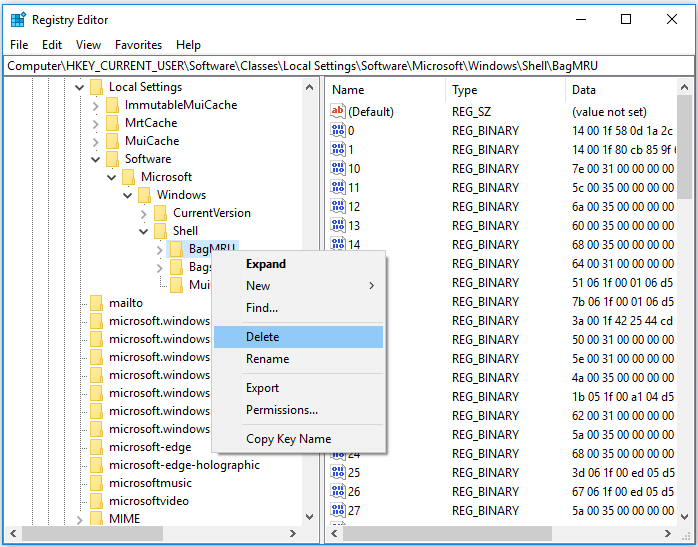
Fix 1. Delete Registry Keys
The Bag keys store information about each folder including its display settings, You can delete these keys to reset the settings for all folders on your computer, which is helpful to fix the issue «File Explorer keeps crashing in Windows 10».
Step 1. Press «Windows + R» simultaneously and enter Regedit. In the prompt asking for permission, click «Yes».
Step 2. Go to:
\HKEY_CURRENT_USER\Software\Classes\Local Settings\Software\Microsoft\Windows\Shell
Step 3. Expand «Shell» and deleted both «BagMRU» and «Bag» keys by right-clicking the folder and choose «Delete». (It is safe to delete these keys because Windows will automatically rebuild them after a restart.)
Step 4. Restart your computer and check whether File Explorer still crashes.
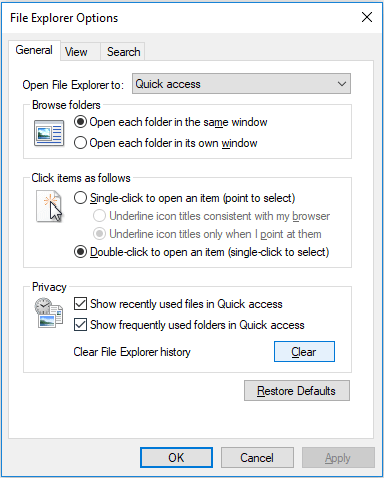
Fix 2. Clear File Explorer History
It’s not clear how the File Explorer history makes the application crash. But many users have fixed their File Explorer that keeps crashing simply by clearing its history.
Step 1. Click the «Start» button and enter file explorer.
Step 2. Choose «File Explorer Options» in the result.
Step 3. In the «Privacy» section, click «Clear». The clearing process will be completed in seconds.
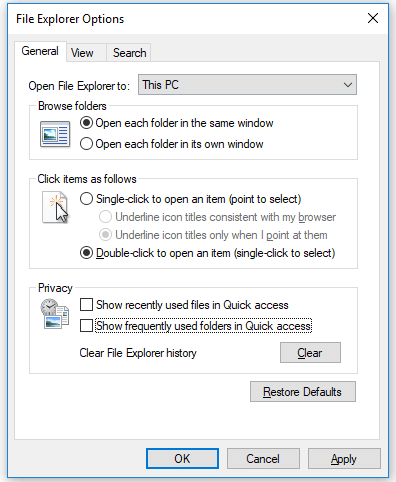
Fix 3. Disable Quick Access and Set Open File Explorer to This PC
Although Quick Access enables you to open a folder you frequently visited faster, it could be the reason why your File Explorer keeps crashing in Windows 10. Try to disable this feature and set File Explorer to open to This PC instead of Quick Acess.
Step 1. Click the «Start» button and enter file explorer.
Step 2. Choose «File Explorer Options» in the result.
Step 3. In the box next to «Open File Explorer to», select «This PC».
Step 4. In the «Privacy» section, uncheck both «Show recently used files in Quick access» and «Show frequently used folders in Quick access.»
Step 5. Click «Apply» > «OK».
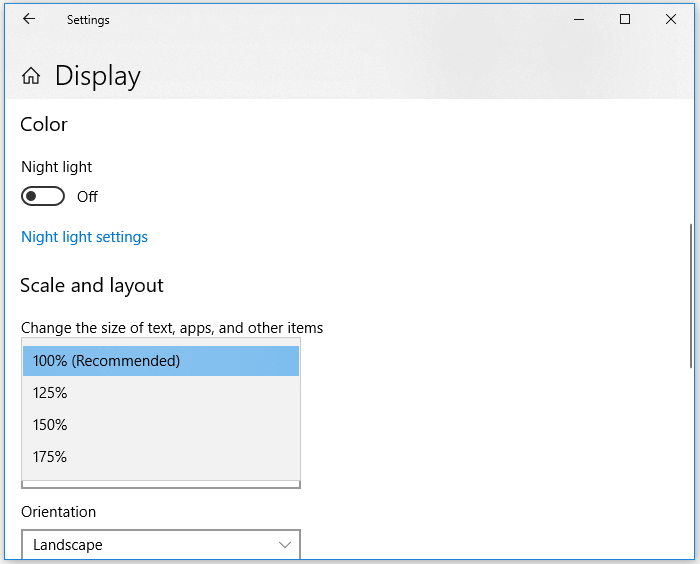
Fix 4. Change Display Settings
Have you ever changed the size of the text, apps, and other items on your computer? If you did, that’s probably why your File Explorer crashes so often. Make sure the size of text, apps, and other items is 100% or 200%.
Step 1. Click the «Start» button and enter display.
Step 2. Choose «Change display settings» on the list.
Step 3. In the Settings window, navigate to the «Scale and layout» section.
Step 4. Set the size to be «100% (Recommended)» or «200%» if it’s available.
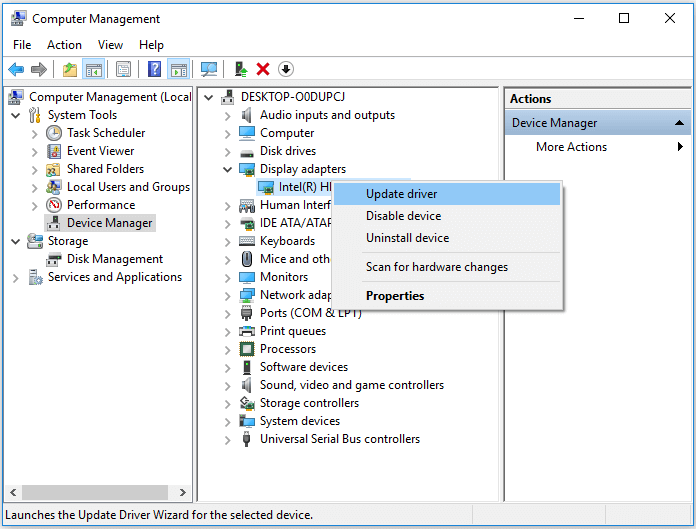
Fix 5. Update Graphics Card Driver
Outdated graphics card driver may also be the culprit that results in File Explorer crashing in Windows 10. To exclude this factor, you can update the graphics driver on your computer.
Step 1. Right-click on «This PC» and go to «Manage» > «Device Manager».
Step 2. Expand «Display adapters», right-click on the graphics card driver and choose «Update driver».
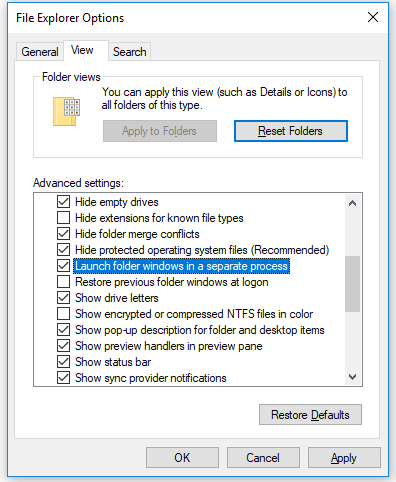
Fix 6. Enable Launch Folder Windows in a Separate Process
By default, all File Explorer windows, including the desktop shell, run in a single process called explorer.exe. If one of the File Explorer windows hangs or crashes, it will cause all File Explorer windows to hang or crash. Thus, to improve the stability of File Explorer, you can enable to launch folder windows in a separate process.
Step 1. Click the «Start» button and enter file explorer.
Step 2. Choose «File Explorer Options» in the result.
Step 3. Switch to the «View» tab and scroll down to check «Launch folder windows in a separate process».
Step 4. Click «Apply» > «OK».
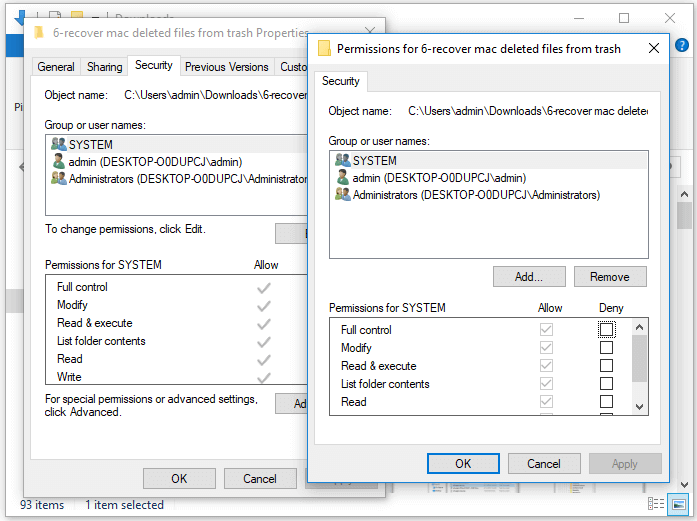
Fix 7. Check Account Permission
If Windows 10 File Explorer keeps crashing when you access a specific folder, you should check whether you have full permission over this folder.
Step 1. Find and right-click on the file/folder you want to delete, then choose «Properties».
Step 2. Click the «Security» tab and choose «Advanced» at the bottom.
Step 3. Click the link «Change» next to «Owner».
Step 4. In the box, input everyone and click «OK».
Step 5. Go back to the «Security» tab, click «Edit» to change permissions.
Step 6. In the «Permissions for SYSTEM» section, choose «Allow» for all permissions.
Fix 8. Run Netsh Winsock Reset
The command «netsh Winsock reset» is used to recover the computer from any socket errors that occur when you download some unknown file, or due to some malicious script on the computer. In some cases, running this command will help users solve the problem «Windows File Explorer keeps crashing».
Step 1. Click the «Start» button and type cmd.
Step 2. Right-click «Command Prompt» and choose «Run as administrator».
Step 3. In Command Prompt, enter netsh winsock reset and wait for the Winsock Catalog to be reset.
Step 4. Restart your computer.
Fix 9. Disable or Remove Recently Installed Antivirus Software
Have you installed some antivirus software before File Explorer crashing so consistently? If so, try to disable the software or remove it completely.
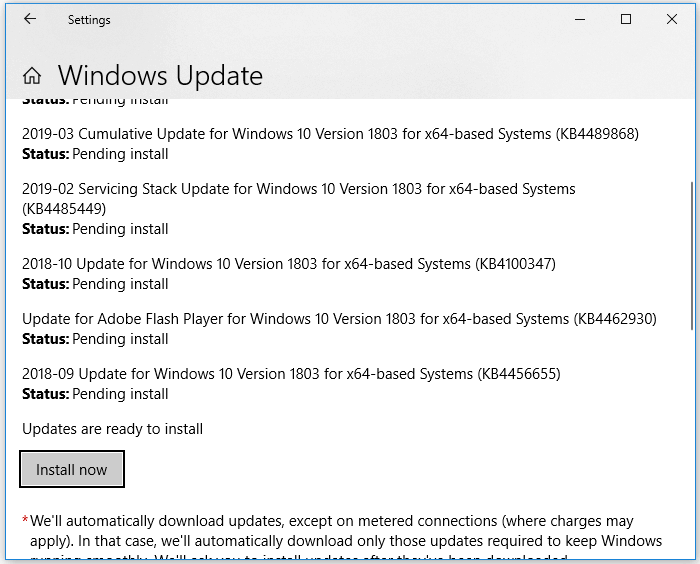
Fix 10. Keep Windows Updated
«File Explorer keeps crashing in Windows 10» may occur due to the bugs in the Windows operating system. Microsoft keeps improving the OS by rolling out Windows updates. Thus, keep your Windows updated if there is a new update available.
Step 1. Click «Start» and type update.
Step 2. Choose «Check for updates».
Step 3. Windows will show you the new updates available. Click «Install now» to update your Windows.
Extra Tip: How to Recover Lost File from Windows
If during the fix, you have mistakenly deleted files from your computer, you can rescue your data easily using hard drive recovery software – EaseUS Data Recovery Wizard. Or if you have encountered data loss on your storage device like external hard drive, USB flash drive, SD card, and more, you can also use this software to get back your precious files. Download for PCDownload for Mac
Step 1. Select a location and start scanning.
Launch EaseUS Data Recovery Wizard, hover on the location(hard drive partition, external HDD, Card devices) where you lost data, then click «Scan».

Step 2. Preview and select the files.
Wait until the scanning completes. If you need to double-click the item to preview the file, then select the data you attempt to recover.

Step 3. Recover lost data.
Click «Recover», choose a location to save the recovered data, then click «OK». You should store the data in another place instead of the original one.

The Bottom Line
I believe one of the fixes above can help you fix the File Explorer on your Windows 10 PC that keeps crashing. If you find yourself have the need of data recovery, don’t hesitate to try EaseUS Data Recovery Wizard which is 100% secure, virus-free, and plug-in free.
Tras identificar problema AppHangB1 de hace meses
✔️
inicio,ejecutar,escribis MSCONFIG te aparece una ventana,eleji la pestaña INICIO te saldra una lista de programas,estos son los que arrancan con windows cuando vos prendes la maquina,deja solo el anti virus..aplicas aceptas y reinicias..despues haces un ecan con el anti virus..suerte
✔️ start the computer in safe mode and of control
safe mode starts Windows with a limited set of files and drivers. Startup programs do not run in safe mode, and only the basic drivers needed to start Windows are installed that, follow these steps to start the computer in safe mode with networking:
(A.) to restart the computer using safe mode, restart the computer and press the F8 key for about four to five times. Appears in safe mode listed in the advanced options of Windows. Select Safe Mode, and then press ENTER.
Now check if you are able to work with your programs, if you are able to start the computer in safe mode only, then the problem may be with all the conflicting startup items on your computer.
(B) you may need to perform the clean boot on your computer, to help troubleshoot error messages and other issues, you can start Windows Vista by using a minimal set of drivers and startup programs. This type of boot is known as a «clean boot». A clean boot helps eliminate software conflicts.
The following link has steps showing how to perform the clean boot: http://support.microsoft.com/kb/929135
(1) perform the clean boot (check the link to perform the clean boot)
(2) enable half the services
(3) determine whether the problem returns
(4) enable half of the startup items
(5) determine if the problem returns
(6) repeat the steps above until you find out which program or service is causing the issue
After you determine the startup item or the service that is causing the problem, contact the manufacturer of the program to determine if the problem can be solved. Or, run the System Configuration utility, and then click to clear the check box of the element of the problem.
Note: Please make sure that the computer is configured to start as usual by following step 7 of article:http://support.microsoft.com/kb/929135
If the problem persists, I suggest that you perform a scan of the file system [SFC] checker on the computer, this replaces the corrupt system files with system Version of Windows on the computer files, follow these steps to perform a scan:
I suggest to empty the temp folder and later, follow these steps:
i. Click Start > type % temp % in the start search box > press on enter > delete everything present in the temp folder.
1. Click Start and type cmd in the box start the search.
2. right click on cmd in the list programs and then click Run as administrator.
If you are prompted for an administrator password or a confirmation, type your password or click on continue
3. at the command calls, the following line and press ENTER: sfc/scannow
When the analysis is complete, test to see if the problem you are experiencing is resolved.
Additional information: http://windows.microsoft.com/en-US/windows7/products/features/system-restore
https://www.winhelponline.com/blog/fix-slow-right-click-crashes-shell-extensions/
https://docs.microsoft.com/en-us/sysinternals/downloads/process-explorer